Tuesday, May 31, 2016

Displaying Exception Messages Based on Condition@OAF


Displaying Exception Messages Based on Condition

Let us learn how to create an Exception messages in OAF. This lesson will take us to show that how to create a Exception messages, alert messages, warning mesesages in OAF pages.
  1. First create one page in a project.
  2. Create the Region and two items.
One Item to enter text so take it as “Message Text Input” and another items is “Submit Button”. Hence we already seen in previous chapters how to create Message Text Input item and Submit Button.
  1. Create the controller and write the code in the process Form Request, we are going to write the code in process form request because whenever we click on submit button based on the condition the Message should be displayed.
  2. Here we are creating one Message Text input item and three submit buttons each button will display different messages.
    The below figure shows the page structure Contains :
    Message Component Layout Region
    —Under it: Message Text Input Item
    : Message Layout Item
    —- under message layout item
    :Submit Button 1 with prompt : Exception
    :Submit Button 2 with prompt : Alert
:Submit Button 1 with prompt : Warning


Now run the page and just see the output how it looks, the below figure shows the sample output and if we observe there is no gap between Submit Buttons and Message Text Input Item.


Now to create a space between buttons and items we have one item called “spacer”. Create two items under Message Layout and select Item Style as spacer and in Property Inspector give width as 10.
Click on the spacer item hold it and drag it between the Submit Button items, in Message component Layout region directly we cannot create spacer item so there fore create one message layout hold that item and place between Message Text Input item and Message Layout Item which is created early.
Now under the second message Layout item create one item with Item Style as “spacer” and give height as 10 in Property Inspector.

After creation the page structure looks like the following:


Create the controller under the main region and write the code logic in “process Form Request”.

  public void processFormRequest(OAPageContext pageContext, OAWebBean webBean)
  {
    super.processFormRequest(pageContext, webBean);
    if(pageContext.getParameter("item2")!=null)
    {
      String v=pageContext.getParameter("item1");
      throw new OAException(v,OAException.ERROR);
    }
    if(pageContext.getParameter("item4")!=null)
    {
      String v=pageContext.getParameter("item1");
      throw new OAException(v,OAException.CONFIRMATION);
    }
    if(pageContext.getParameter("item3")!=null)
    {
      String v=pageContext.getParameter("item1");
      throw new OAException(v,OAException.WARNING);
    }
  }

}
In the above code item3, item4, item5 are the id values of the Submit Button items with prompt Exception, Confirm, Warning. Item6 is the id value of Message Text Input item.
The import package is :
import oracle.apps.fnd.framework.OAException;
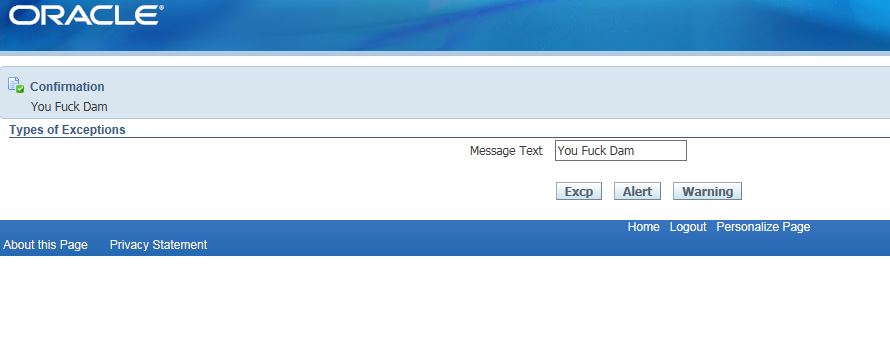
run the page and see the output. Give some text in Message Input Text and then click on the button to see the messages displayed on OAF. For example see the following:

OUTPUT::

Warning Button::


Error::


Alert::


Displaying Images on Page @OAF

Displaying Images on Page 


Let us see how to put images in OAF. The following are the two ways we can keep images in OAF pages:
I) Changing the ORACLE logo to company branding logo.
II) Displaying Images in Page.
1) Changing the ORACLE logo to company branding image.
All the images in Oracle Applications are available in OA_MEDIA  directory.
Step 1:
If we want to know the path where exactly the OA_MEDIA directory exists in Sever, Open a third party tool which connects to the Sever in command prompt like SSH connection manager.
Type the following command in SSH:

ls *.env
set Environment

[xxx@xxx ~]$ . APPSTEST.env
[xxx@xxx ~]$ cd $OA_MEDIA
[xxx@xxx media]$ pwd
/us1001/TEST/apps/apps_st/comn/java/classes/oracle/apps/media


Directly we cannot create Image item in Message Component Layout Region, so therefore first we need to create Message Layout item.


The below figure shows the Image item property Inspector under the Message Layout region:


In the Image URI give the path of the image which you want to display. Run the page and see the output:


END


Friday, May 27, 2016

Displaying Data From Data Base @OAF using ViewObject and Creating Region in wizard


Displaying Data From Data Base


In this lesson we are going to see how to display a data from the data base in OAF.
Follow the steps to display the data in OAF page from the Data Base:
  1. Create the page.
  2. Create the VO in respective BC4J and attach it to AM.
  3. Create the controller and write the logicode in Process Form Request.
To create a VO right Click on the Resources Folder of the project and then select New View Object…
To see all the steps that how to create the VO we can see in previous chapter.
Write the following Query statement in VO
SELECT * FROM mtl_system_items_b WHERE  ROWNUM < 101
After creating VO attach VO to AM (Application Module).
Now select main page right click on the main region select New -> Region Using Wizard…


Controller…
Now after creating the controller write the following code in the process Form Request.
public void processFormRequest(OAPageContext pageContext, OAWebBean webBean)
{
super.processFormRequest(pageContext, webBean);
if(pageContext.getParameter(“item1”)!=null)
{
/* The below code line is used to initialize the application module */
OAApplicationModule am=(OAApplicationModule)pageContext.getApplicationModule(webBean);
/* The below code line is used to initialize VO*/
OAViewObject vo=(OAViewObject)am.findViewObject(“ItemsVO1”);
/* ItemsVO1 is the instance name in AM which is the original name of the VO */
vo.executeQuery();
}
}


OUTPUT::


Thursday, May 26, 2016


Oracle Applications Framework related articles 


https://blogs.oracle.com/prajkumar/entry/oaf_developer_guide


Message Radio Button @ OAF


Message Radio Button

In this lesson we are going to learn how to use Radio Button items in the OAF page.
We can create individual Radio Button items in the page as a named set with mutually exclusive values. It means we can place radio Buttons where ever we require in a page but if we provided a mutually exclusive name to all those radio button items then only any one will be checked.
Let us see one small example how to create a Radio Button Items in the page:
Step 1: Create a page and create one Message Component Layout region in a page. Under the region create four items and select the Item Style as “messageRadioButton” . Example see the below figure


Step 2:  Now after creating Radio Button items give Id values to each items created and assign Prompt name which ever you wish to display for the radio button.
Step 3: Set the checked value and unchecked value to each radio button in the Property Inspector.
Step 4: If we want radio buttons to behave as a group then we must programmatically assign them all the same name by calling setName() for each radio button.
First create one controller and write the program in the processRequest().


Remove one webui from the package name and give controller name and note that every controller ends with CO (general standard).


Write the program in the processRequest(), here I am not providing any access to the code to copy and paste it in the JDeveloper because whenever we write the code we need to import the package in the program which we can get automatically from R12 series on wards.
For example whenever we are typing “OAMessageRadioButtonBean” then JDeveloper prompts us to use “Alt-Enter” to import the required package. So as of now it is better practice to type the code rather than copy and paste.
We already explained the concept of programming in previous Chapter (Displaying User Name, User ID, Responsibility Name, Responsibility ID).
The below figure shows the written code in the processRequest():


Now after righting the code rebuild the code by giving Right click on the program select option called Rebuild.
After successful compilation of program run the page and see the output, if we test the output radio buttons we can select any one out of four available items because we set a unique names to all the items in the program using variable Name . (dot) setName() method. See the code in above picture for confirmation.
The below figure shows output of the program which shows additionally other items too rather than radio buttons:

END


Wednesday, May 25, 2016

TYPES OF Region @ OAF

TYPES OF Region IN OAF


1.Message Component Layout Region
2.Header Region
3.Row Layout Region


Message Component Layout Region

In this chapter we are going to learn creation of regions in the page and for each region here we are taking two or more items with item style as “messageTextInput” so that we will come to know that how the items are placed in the regions. Each region will place items in different styles. Let us see some layout regions:
1) Message Component Layout Region
First create one Project which we learned in previous chapters like Welcome Page creation.
After creating a page, go to page structure and select region after selecting region right click on the region and then select New-> Region. Now a region will be created under a page region.

After creating region change the region style to “MessageComponentLayout” in the property Inspector as shown in the below figure:


Observe the property inspector and in the visual we added 1 to the rows and 3 to the columns, to see how this rows and columns effect. See the output and observe the items how they are placed by JDeveloper automatically, for that first create items under MessageComponentLayout region, here we created 5 items under the message component layout region and then after creating see the structure of the page how it looks like:


Give the prompt names to each items and remember here we are taking item style as “messageTextInput” for all the items, run the page and see the output to see how the items are placed in message Component Layout region:


Header Region


In previous lesson we learned how the Message Component Layout region looks like and how to create it, now using the same page here in this lesson we are going to see how the Header Region looks like and what are the properties available in the Header region in JDeveloper.
Header Region Creation
Right click on the main region and select the New -> Region as shown in the below figure:


Select the region style as Header and if we observe in the visual area we can provide Text, give some text like Header Region and while when comparing this header region with the message component layout region we can observe that in message component layout region we don,t have a option to provide Heading text where as in Header region we can provide headings but item control is not there like rows and columns in MessageComponentLayout Region.
The below figure shows the property inspector of Header Region just have a look:


Now after creating Header region create three items with Item Style as MessageTextInput:

Similarly create two more items to see the items arrangement in Header Region, and note that for all the items the item style is MessageTextInput.

Give some prompt names to all the items


After creating three items the structure of the page looks like the following:


Now run the page and see the output here we can identify the difference between Header region and MessageComponentLayout region:


Row Layout Region


In this lesson we are going to see how the rowLayout Region looks like and how the items are displayed inside the rowLay0utRegion.
Creating Row Layout Region
First create one page, here we are taking the same page which we created in the previous chapters and it already contains MessageComponetLayout region and Header region.
Create one region, right click on the main region and then select New -> Region


Select region style as “rowLayout” in the Property Inspector, and if we observe the Property Inspector we have Horizontal Alignment and Vertical Aligment .
Center, End, Left, Right, Start are the available alignments for Horizontal. By Default , Default is the alignment type which is nothing but works as Start Alignment.
For Vertical Alignment Bottom, Middle, and Top are the available alignments.
The below picture shows the property inspector of Row Layout Region:


After creating RowLayout region create four items under the rowLayoutRegion and also give prompt names for each created items under RowLayout region.
Now run the page and see the output, it displays all the items in single row.
The below figure shows how the output looks like and also observe that in the below figure how the items are placed in MessgeComponentLayout region and Header Region along with the Row Layout region.